- A Comprehensive Overview of Dental Crowns
- Dental Crown Procedure: Prep, Sessions, and Final Result
- Types of Dental Crowns: Helping You Find the Best One
- Dental Crown Cost: Prices All Around the World Explained
- Dental Crown Turkey: Is Turkey Really a Good Option?
- Dental Crown Problems: Prevention & What to Do
Anesthesia: Topical and local | Tooth preparation: 4-5 hours | Sessions: Minimum 2 |
Treatment depth: Invasive | Fitting Session: 1-2 hours | Type of Procedure: Cosmetic |
A dental crown procedure is a long, but in the end, satisfying aesthetic treatment. With a success rate of almost 94%, dental crowns are highly demanded globally. Whether because of tooth decay, injury, dysfunction, or simply a desire to get the smile of your dreams, you can get a dental crown.
Not only do dental crowns help you get the smile you wish to have, but they also help preserve your teeth below them.
This article will explain how the procedure runs by pointing out these takeaways:
- THE DENTAL CROWN PROCEDURE LASTS ROUGHLY 5-7 HOURS
- DENTAL CROWN IS CONSIDERED COSMETIC
- IT MIGHT TAKE DAYS OR WEEKS FOR YOUR CROWN TO BE READY
- IT WILL TAKE AT LEAST TWO DENTIST VISITS FOR YOU TO BE DONE WITH A DENTAL CROWN PROCEDURE
- SAME-DAY CROWNS ONLY REQUIRE ONE VISIT
- YOUR CROWNS WILL NEED REPLACEMENT IN TIME
- CHILDREN CAN ALSO GET CROWNS
And now, let’s begin our detailed journey of how a dental crown procedure proceeds!
Steps of the Dental Crown Procedure
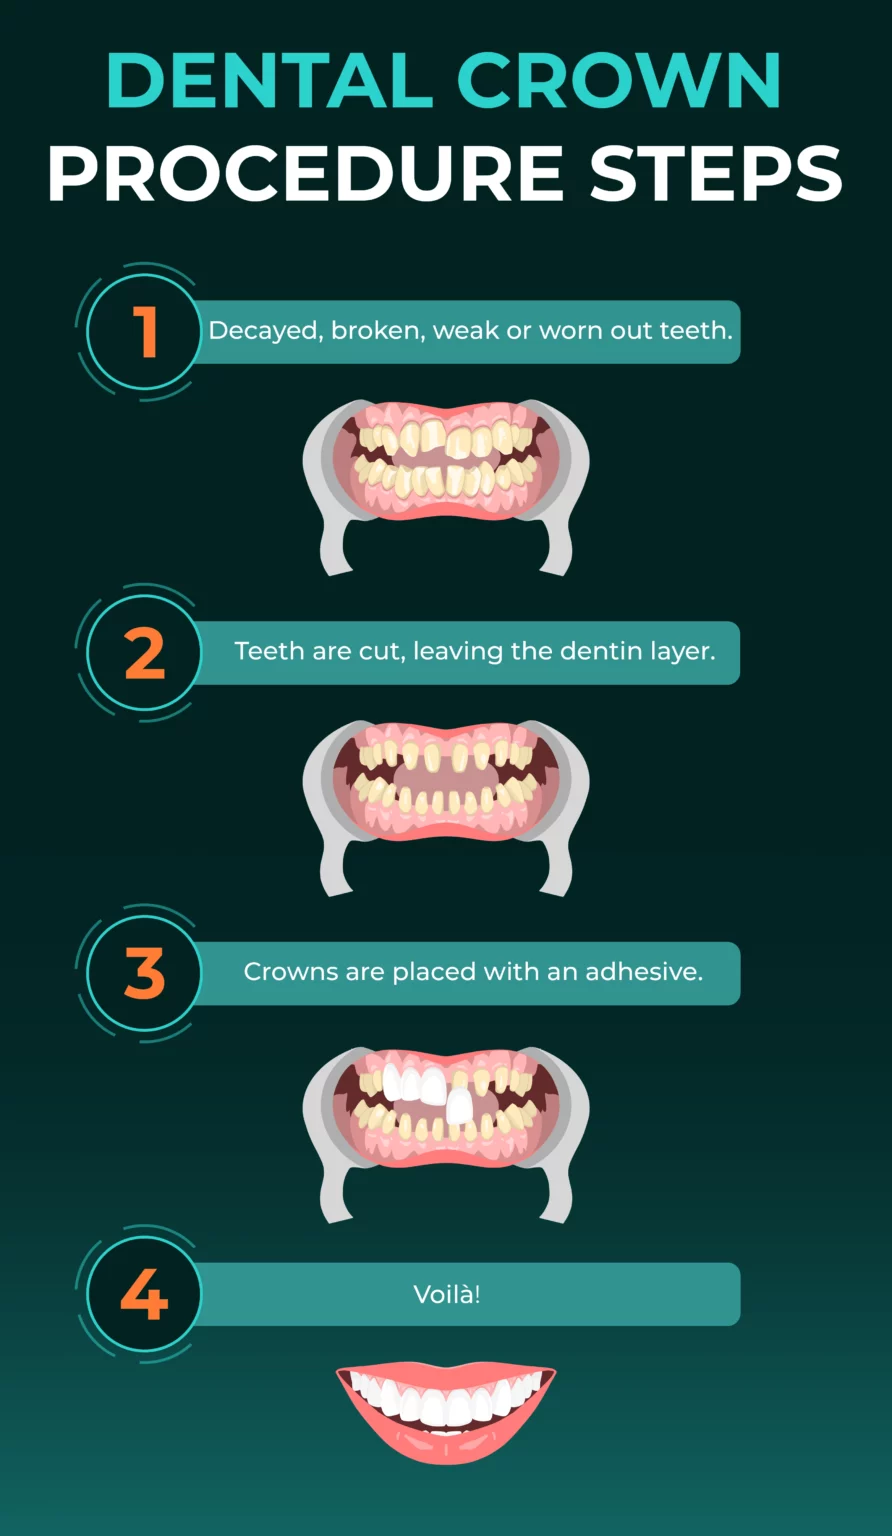
Generally, steps of the dental crown procedure are told in 3 steps: preparation, cutting, and crown placement. However, here’s a more vivid and detailed exposition of the dental implant procedure.
- Step 1: Consultation
- Step 2: Pre-op Impressions
- Step 3. Preparation
- Step 4: Impressions and Selections
- Step 5: The fitting Session
- Step 6: Placing the Crowns
- Step 7: Polishing
Here’s what to expect in every step of the dental crown procedure.
Step 1: Consultation
First of all, the initial consultation occurs. You will talk with your dentist about your needs, goals, desires, medical history, present dental issues, and the desire you wish to achieve.
At this point, you will start discussing the shape, color, and size of your crowns along with determining which teeth will be getting crowns. You will have the conversation again after the preparation.
Your dentist will also ask you about any other illnesses, allergies, or habits that you have. These will help your dentist tailor the procedure as needed. Your initial consultation and preparation will occur on the same day, provided you do not require any other treatments beforehand.
Step 2: Pre-Op Impressions
Before the preparation process begins, a mold of your current teeth will be taken for the temporary crowns, which you will be using until your permanent crowns are ready.
After the impressions are taken, a digital impression will be made of your teeth using a 3D scanner. This scanner takes 2000 photos of your teeth to make accurate impressions.
⚠️ If you have any present dental issues that might affect the dental crown procedure, they will be addressed and resolved before this step. In some cases, crowns cannot be done to teeth with certain conditions and might require different treatments, such as implants.
Step 3: Preparation
The preparation begins! First, a topical anesthetic gel will be applied to your gums. This will help with the application of the local anesthetic injections. Approximately 4 injections of local anesthesia will be applied for each part of your gums. The dentist will later massage the area to spread the anesthesia along your gums and palate.
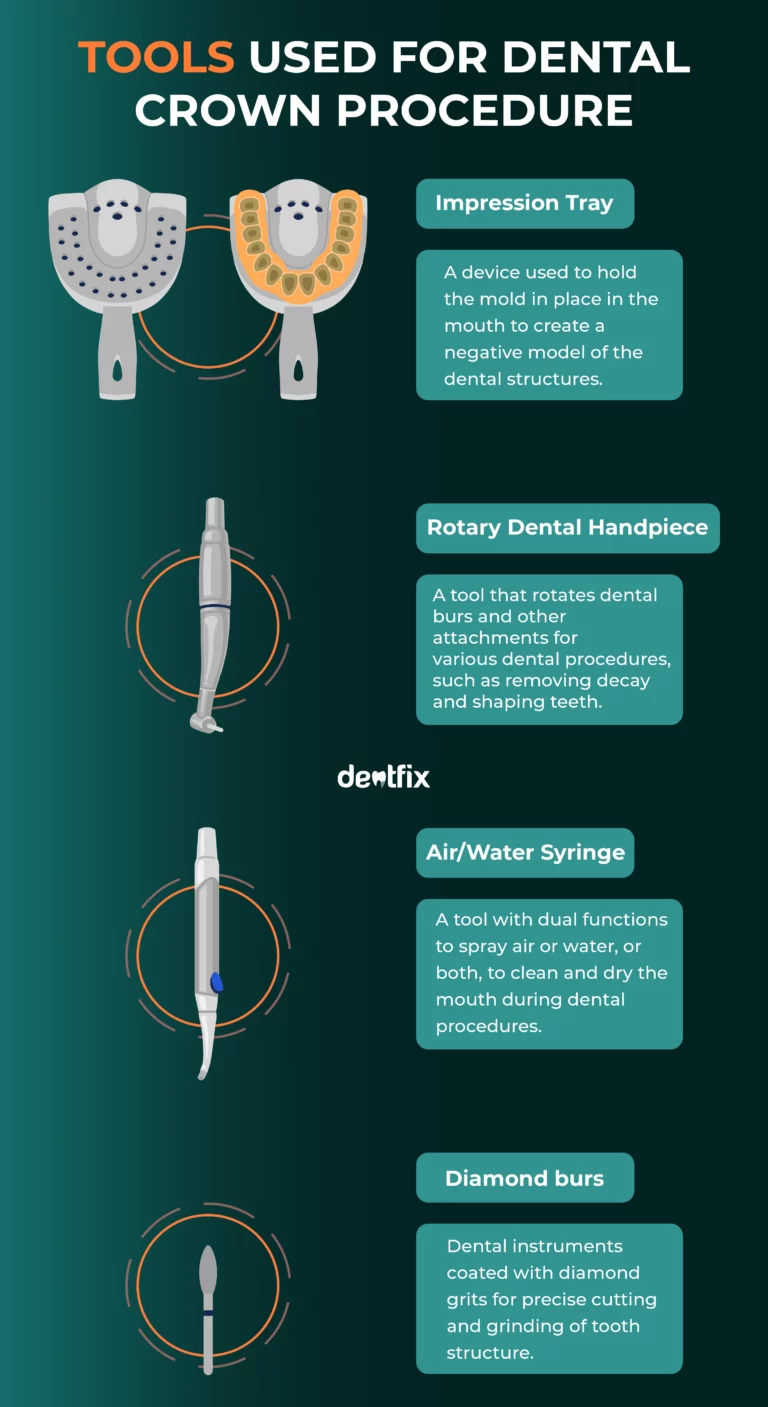
After anesthesia kicks in, your dentist will put a bite guard between your upper and lower molars to prevent you from closing your mouth. Then they will start cutting your teeth using diamond burs attached to a rotary dental handpiece. Using this tool, the dentist will also spray water onto your cut tooth to prevent tooth dust from scattering around, and that water will be removed from your mouth using a suction device.
Did you know? |
The cutting will create a base for the crown. The dentist will cut until they reach the dentin (approx. 5mm). However, if the tooth is crooked, depending on where it leans toward, the dentist might cut a bit more to make the crown sit on it straight. The teeth will be cut in a semi-circular way. They will have no edges or sharp points. Otherwise, the crown will not sit on the tooth correctly, so it is a must.
The dentist will occasionally step back to check the cut depth and the nose-to-forehead line to make sure they look symmetrical. The dentist does this also because they can experience eye fatigue.
Sometimes teeth preparation can take longer than anticipated. The patient’s jaw can get tired, so, you might be asked to visit the clinic again the next day to continue the preparation. Of course, you will leave the clinic with temporary crowns.
The “all-should-know” tooth preparation method: The dentist will leave a circular bevel (step-stair bevel) on the cut teeth near the gumline. This bevel helps the crown sit better. Also, before taking an impression for the technicians, the dentist uses an aluminum oxide gel on the bevels to make them more visible. This gel also helps stop bleeding and also helps the gum separate from the tooth. |
Step 4: Impressions and Selections
After your teeth are cut, the dentist will take another impression for the temporary and permanent crowns.
While the impression for the permanent crown is being sent to the lab for preparations, the impression for the temporary crown will stay with your dentist. Using silicone, the dentist will prepare a temporary crown that looks exactly like your teeth before being cut will be made. This will help you return to your everyday life before your crowns are ready.
Temporary crowns are not durable, and they are meant to last for 3 days to 3 weeks tops.
After that, the dentist will show you a catalog for the shape and color of the crowns. After you pick your choice, the dentist will then place the order for the lab to prepare.

Step 5: The Fitting Session
After your crowns are fresh out of the lab, you will be asked to come to the clinic for a fitting session.
In this step, you will have your crown fitting. The dentist will try on the crowns one by one to see if any alterations need to be made. If the alterations needed can be done with the dentist alone, he will do the alterations and make sure you can bite properly and the teeth look aesthetically in great shape.
If you have any additional changes you want to make, the dentist will let the technicians in the lab know and a new set of crowns will be made for you.
Step 6: Placing the Crowns
When you are satisfied with the crowns, the dentist will then start gluing the crowns on your teeth using a resin-modified glass ionomer. This adhesive (type of glue) has both mechanical and chemical features. It is strong and durable, and the saliva on the teeth does not affect the effectiveness of the adhesive.
Resin-modified glass ionomer adhesives also help make teeth way less sensitive. After all your crowns are placed, the dentist will later hold UV light to help the adhesive set.
To remove the adhesive and gum residue, the dentist will floss in between the teeth. After the crowns are set, using articulating papers the dentist will adjust your bite to make them proper. If you can bite and break off the clear articulating papers, that means your bite is proper.
Step 7: Polishing
And the last step! After everything is set and done, your crowns will be polished.
A moss-based powder will be mixed with water. The mixture will be put on a mold and the mold will be inserted into your palate. This mixture helps polish the teeth and give them a beautiful shine.
The dentist will help you bite it down. This might be mildly uncomfortable and might slightly trigger your gag reflex.
After this process, you can say hello to your brand-new smile!
Traditional Dental Crown Procedure vs Same-day Procedure
Traditional crown procedure consists of at least 2 visits, and a few days or weeks to prepare the crowns.
While traditional crowns are somewhat of a lengthy procedure, same-day crowns are just as they are called. The preparations for both procedures are quite similar, but they differ in lots of aspects.
The impression of your teeth will be taken using digital impressions and CAD/CAM technology and then the teeth preparation will begin. After it is done, provided you do not need additional treatments concerning your dental health, your crowns will be prepared. Using a CEREC machine, your same-day crowns will be prepared and later will be inserted into your prepared teeth.
Traditional dental crown | Same-day crown |
More durable | 10-30 years | Less durable | 10-15 years |
Longer overall procedure | at least 2 visits / 3 days to 3 weeks | Shorter overall procedure | 1 visit / few hours |
Costs less | Costs more |
Prepared in a lab | Prepared in a CEREC machine in the clinic |
Requires temporary crown | No need for a temporary crown |
Traditional impressions and/or digital scans | Digital impressions and CAD/CAM technology (greater precision) |
What are the disadvantages of same-day crowns?
Same-day crowns might sound fast and easy, which they are compared to classic dental crowns. However, they come with certain downsides. Disadvantages of same-day crowns include:
- THEY ARE MADE OF CERAMIC, THEREFORE LESS DURABLE
- THEY ARE NOT ALWAYS THE BEST OPTION FOR CERTAIN CONDITIONS SUCH AS JAW CLENCHING
- BECAUSE THE IMPRESSIONS ARE TAKEN VIA A 3D SCANNER, FRACTURES ON THE GUMLINE ARE NOT ALWAYS VISIBLE
If your dental crown breaks or falls off, you should make an emergency call to your dentist to replace it.
Can children get dental crowns?
Yes, children can also get dental crowns. A crown procedure for a child does not differ too much in the method. There are a few points where they differ. Which are:
- Material used: Crowns for children are usually made with stainless steel or polycarbonate, especially for their baby teeth.
- Simpler procedure: A dentist’s clinic can be overwhelming for children. So the procedure is much simpler and faster for a child’s crown procedure.
- Sedation: Children might get anxious during a crown procedure, especially during teeth preparation. For that, some children might need sedation.
- Volume of the teeth preparation: Children’s teeth are already small. So while preparing their teeth for crowns, the dentist cuts way less of the teeth.
The replacement procedure
Yes, crowns are long-lasting. But they need replacement every 10-15 years due to wearing or other external factors.
Dental crown restorations are relatively easy. The crown is first removed along with the adhesive used to place it. Afterward, if there is any decay on the cut tooth, it is again cut.
If the tooth is damaged beyond saving, another treatment for the tooth might come in handy. Depending on numerous factors, other treatments to help with the tooth can be root canal treatment, dental implant, dental bridge, or partial denture.
If the tooth, however, is still healthy and can support a crown, an exact replica of the crown will be prepared. Of course, beforehand, impressions will be taken in order to support changes that may have occurred within the years. The crowns then will be altered accordingly and will be applied to your teeth.
References:
- Jakovljevic, I. V., Todorovic, A., Budak, I., Sokac, M., Milicic, B., & Gostovic, A. S. (2020). Measurement of dental crown wear -In vitro study. Dental materials journal
- Cunliffe, J., & Grey, N. (2008). Crown lengthening surgery–indications and techniques. Dental update
- Mollo, A., Cortellini, S., Bonaccini, D., Stalpers, G., & Cortellini, P. (2021). Treatment planning of teeth with compromised clinical crowns: endodontic, reconstructive, and surgical strategy. The international journal of esthetic dentistry
- Lynch, C. D., Hale, R., Chestnutt, I. G., & Wilson, N. H. F. (2018). Reasons for placement and replacement of crowns in general dental practice. British dental journal
- Ding, H., Cui, Z., Maghami, E., Chen, Y., Matinlinna, J. P., Pow, E. H. N., Fok, A. S. L., Burrow, M. F., Wang, W., & Tsoi, J. K. H. (2023). Morphology and mechanical performance of dental crown designed by 3D-DCGAN. Dental materials : official publication of the Academy of Dental Materials
- McCracken, M. S., Louis, D. R., Litaker, M. S., Minyé, H. M., Mungia, R., Gordan, V. V., Marshall, D. G., Gilbert, G. H., & National Dental Practice-Based Research Network Collaborative Group (2016). Treatment recommendations for single-unit crowns: Findings from The National Dental Practice-Based Research Network. Journal of the American Dental Association (1939)
- Shugars, D. A., Hayden, W. J., Jr, Crall, J. J., & Scurria, M. S. (1997). Variation in the use of crowns and their alternatives. Journal of dental education